Note: This post is part of Learn How to Use TypeScript With Node.js and Express.js series. Click here to see the first post of the series.
Unless we are learning how to use newer technologies or developing a simple application that doesn’t require a database, it is typical to have applications connected to a database. In fact, data is considered the most important aspect of software as it impacts and defines in great part how we write our code.
In this article, we are going to integrate a MySQL database with a Node.js and Express.js REST API using TypeScript. Among the many steps to follow, we will generate our database, install dependencies to connect to the database, create a MySQL connector, create services that will connect to the database, and finally we will test the code.
Table of Contents
Are we using an ORM?
For those who don’t know what an ORM is, it stands for Object-Relational Mapping and it is a way for an application to interact with a database without writing raw queries, but instead through the usage of objects or models that are shaped to the way the database tables are shaped.
This means if we have a simple teams table with the following columns:
- id
- name
- date_created
- created_by
- date_updated
- updated_by
And want to fetch a specific record from that table in SQL, we would use a regular SELECT query:
SELECT * FROM TEAMS
WHERE
   id = 123
However, we would create an object in the programming language of our application and use methods provided by the ORM to interact with the database:
const team = await teamRepository.findOne({ id: 123 });It is common to use an ORM such as TypeORM, but this article will not use it. The main reasons for avoiding an ORM are:
- Raw SQL queries are faster than ORMs
- Adds another dependency, hence another risk to our software
- Avoid learning an ORM and avoid tweaking queries generated by the ORM
- Having full control of queries and optimize them in whichever way we please
This doesn’t mean we are saying ORMs are bad. In fact, there are ORMs allowing you to also write raw queries. However, we consider there are more benefits from not using an ORM rather than using an ORM.
Install MySQL Server
Since in this tutorial we will be working with a MySQL database, it is necessary to have a MySQL Server. If you don’t have MySQL Server installed in your machine, go ahead and install it. The current version of MySQL Server at the moment of writing this article is version 8.0.
Once MySQL Server is installed, install MySQL Workbench which provides an interface to access your MySQL database, and avoid executing all SQL scripts via the command line.
Setting MySQL Connection
Open MySQL Workbench, which should have a similar interface to the following image.
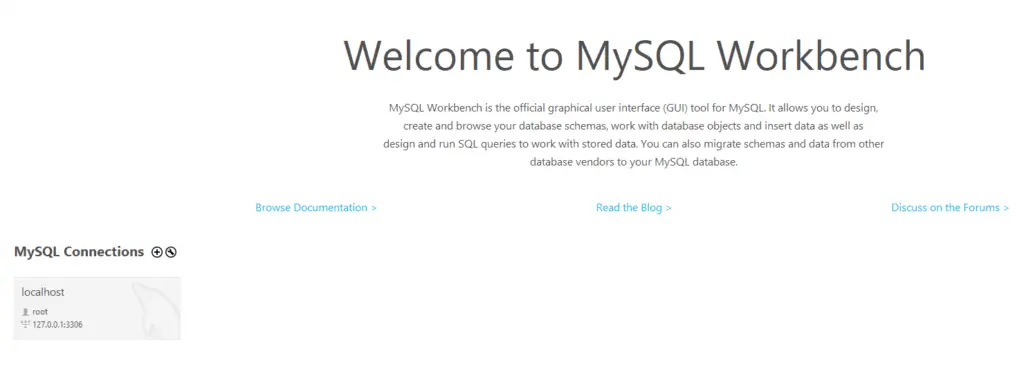
If you don’t have a locahost MySQL connection yet, click the plus icon next to MySQL Connections to add a new connection.

Add the following values to up your SQL connection:
- Connection name: localhost
- Connection Method: Standard (TCP/IP)
- Parameters
- Hostname: 127.0.0.1
- Port: 3306
- Username: root .By default, the username is root and there’s no password.
Click Ok to generate the connection. The new connection should be visible in the main dashboard of MySQL Workbench.
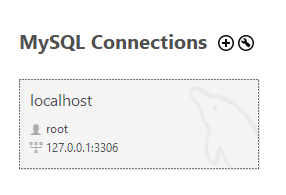
To connect to the localhost connection, double click on it. Notice a new tab was added for the MySQL connection you established. If this is your first time working with MySQL and MySQL Workbench on your machine, you won’t see any schemas like the schemas I currently have.

That’s all for part of the tutorial. We will come back to MySQL Workbench to execute SQL scripts to generate the database our Node.js and Express.js will communicate to.
Generating MySQL Database
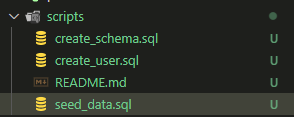
Create a scripts folder at the root of your project. Inside the scripts folder, generate the following files.
- create_schema.sql
- create_user.sql
- seed_data.sql
- README.md
Create Schema
The create_schema.sql file will store the schema configuration for the database. This means it will contain the SQL scripts to create a database and tables inside the database schema. Since this tutorial is part of the Learn How to Use TypeScript With Node.js and Express.js series, our simple database will have the name of teams_system.
Open the create_schema.sql and add the following scripts.
CREATE DATABASE teams_system;

CREATE TABLE `teams_system`.`teams` (
  `id` INT NOT NULL AUTO_INCREMENT,
  `name` VARCHAR(45) NOT NULL,
  `league` VARCHAR(45) NOT NULL,
  `isActive` VARCHAR(45) NULL,
  PRIMARY KEY (`id`));
Notice our teams_system schema will only have a teams table, which is enough for our REST API. Typically, the create_schema.sql file will have much more tables than this.
Create Database User
Our API will need to have access to the database. However, just because the Teams API accesses the database doesn’t mean it should have complete access to the database. This can be a little confusing as you would think the app is the only one communicating to the teams_system database.
For instance, if at some point a product expands or architecture used changes from a monolithic application to a microservice architecture, this means multiple small applications could require access to the teams_system database.
Open the create_user.sql file and add the following script to create the user teams_system_api . Feel free to update the password for teams_system_api. Otherwise, it will use mySecretPassord, which is rather not so secret.
/**
 * Feel free to change the username as well as the password given to it
 */
CREATE USER 'teams_system_api'@'localhost' IDENTIFIED BY 'mySecretPassord';

/* In an ideal world, we should strictly provide the grants the API has access
 * to a specific table rather than all the privileges.
 */
GRANT ALL PRIVILEGES ON teams_system.teams TO 'teams_system_api'@'localhost';

flush privileges;
Notice also we are granting teams_system_api user all privileges to the teams table. This means the user can do actions such as fetch, update or delete data from the teams table.
Add Seed Data
If you’ve been following the Learn How to Use TypeScript With Node.js and Express.js series, at some point we generated an array of teams which was working as our in-app database.
const TEAMS: ITeam[]  = [
  { id: 1, name: 'Real Madrid', league: 'La Liga', isActive: true },
  { id: 2, name: 'Barcelona', league: 'La Liga', isActive: true },
  { id: 3, name: 'Manchester United', league: 'Premier League', isActive: true },
  { id: 4, name: 'Liverpool', league: 'Premier League', isActive: true },
  { id: 5, name: 'Arsenal', league: 'Premier League', isActive: true },
  { id: 6, name: 'Inter', league: 'Serie A', isActive: true },
  { id: 7, name: 'Milan', league: 'Serie A', isActive: true },
  { id: 8, name: 'Juventus', league: 'Serie A', isActive: true },
];
Luckily, we won’t be using this TEAMS array anymore as a database as we integrate a MySQL database. However, the TEAMS array was also serving as seed data in our API. We are going to add seed data to the teams_systems database.
Open the seed_data.sql file and add the following script to add seed data.
INSERT INTO `teams_system`.`teams` (`name`, `league`, `isActive`)
VALUES
  ('Real Madrid', 'La Liga', 1),
  ('Barcelona', 'La Liga', 1),
  ('Manchester United', 'Premier League', 1),
  ('Liverpool', 'Premier League', 1),
  ('Arsenal', 'Premier League', 1),
  ('Inter', 'Serie A', 1),
  ('Milan', 'Serie A', 1),
  ('Juventus', 'Serie A', 1)
;
Update Readme file
Unfortunately, many developers forget to add a README.me file. This file provides the necessary instructions for other developers or database administrators to execute scripts required for an application to work without failures after deploying to production environments.
Open the README.me file and add the following instructions.
Execute the scripts in MySQL database in the following order:
1. @create_schema.sql
2. @create_user.sql
3. @seed_data.sql
Execute Scripts
Time to execute the scripts in the same order described in the README.me file.
Go back to MySQL Workbench. Then, create a new SQL tab by clicking on the icon similar to the following image.

Then, copy each script and execute them in order. For instance, if the first script to execute is the create_schema.sql, copy the script in that file and execute it in the SQL tab.
Install Dependencies
Open your Node.js and Express.js API, and install mysql dependency which is necessary to connect to a MySQL database.
npm install --save mysql
npm install --save-dev @types/mysql
Add Environment Variables
Create a .env and a .env.local file in the root folder of the API application.
Open the .env.local file and save the following values.
 export MY_SQL_DB_HOST = '';
 export MY_SQL_DB_USER = '';
 export MY_SQL_DB_PASSWORD = '';
 export MY_SQL_DB_PORT = '';
 export MY_SQL_DB_DATABASE = '';
 export MY_SQL_DB_CONNECTION_LIMIT = '';
The .env.local will serve as a reference of the environment variables needed for the API to work correctly. We can also commit this file to the repository as it doesn’t have any sensitive information.
Now, open the .env and add the following values.
export MY_SQL_DB_HOST=127.0.0.1
export MY_SQL_DB_USER='teams_system_api'
export MY_SQL_DB_PASSWORD='mySecretPassord'
export MY_SQL_DB_PORT=3306
export MY_SQL_DB_DATABASE='teams_system'
export MY_SQL_DB_CONNECTION_LIMIT=4
Notice the .env file is similar to the .env.local file with the difference that we are adding sensitive information.
Note: Do not commit the .env file to the repository. It is recommended to ignore this file using a .gitignore file.
Loading or Setting Environment Variables
Adding the .env and .env.local files does not necessarily mean the environment variables will be loaded in the application.
To load the environment variables, open the Bash terminal you are using to run the application, and execute the following commands:
set -a
source .env
This will ensure the environment variables are properly set. To confirm the values were set, display the value of one of the environment variables in the same terminal using the keyword echo.
echo $MY_SQL_DB_DATABASECreate Config file
Create a config folder inside the src folder. Then, create a file called vars.config.ts.

Open the vars.config.ts file and add the following logic to set up config values which we will use throughout the whole app.
export const DATA_SOURCES = {
  mySqlDataSource: {
    DB_HOST: process.env.MY_SQL_DB_HOST,
    DB_USER: process.env.MY_SQL_DB_USER,
    DB_PASSWORD: process.env.MY_SQL_DB_PASSWORD,
    DB_PORT: process.env.MY_SQL_DB_PORT,
    DB_DATABASE: process.env.MY_SQL_DB_DATABASE,
    DB_CONNECTION_LIMIT: process.env.MY_SQL_DB_CONNECTION_LIMIT ? parseInt(process.env.MY_SQL_DB_CONNECTION_LIMIT) : 4,
  }
};
Create MySQL Connector
Create a new file called mysql.connector.ts in the following path src/api/utils.
Open the mysql.connector.sql file and add the following code. Don’t worry, we are going to explain what this code does.
import { createPool, Pool} from 'mysql';
import { DATA_SOURCES } from './../../config/vars.config';
const dataSource = DATA_SOURCES.mySqlDataSource;

let pool: Pool;

/**
 * generates pool connection to be used throughout the app
 */
export const init = () => {
  try {
    pool = createPool({
      connectionLimit: dataSource.DB_CONNECTION_LIMIT,
      host: dataSource.DB_HOST,
      user: dataSource.DB_USER,
      password: dataSource.DB_PASSWORD,
      database: dataSource.DB_DATABASE,
    });

    console.debug('MySql Adapter Pool generated successfully');
  } catch (error) {
    console.error('[mysql.connector][init][Error]: ', error);
    throw new Error('failed to initialized pool');
  }
};

/**
 * executes SQL queries in MySQL db
 *
 * @param {string} query - provide a valid SQL query
 * @param {string[] | Object} params - provide the parameterized values used
 * in the query
 */
export const execute = <T>(query: string, params: string[] | Object): Promise<T> => {
  try {
    if (!pool) throw new Error('Pool was not created. Ensure pool is created when running the app.');

    return new Promise<T>((resolve, reject) => {
      pool.query(query, params, (error, results) => {
        if (error) reject(error);
        else resolve(results);
      });
    });

  } catch (error) {
    console.error('[mysql.connector][execute][Error]: ', error);
    throw new Error('failed to execute MySQL query');
  }
}
The code mysql.connector.sql file has two functions. The init and execute functions.
What the init function does: Understanding Database Pooling
The init function creates a pool with the teams_system database. If you are not familiar with the meaning of pool, a database pool is a method to keep a database connection open so it can be reused in the future.
Establishing a connection to a database is an expensive operation. This means, you have open network sessions and authenticate to your database every time you want to make a request to the database. That’s why setting up database pools is a convenient way to quickly make requests to the database.
What the execute function does
The execute function is in charge of executing SQL queries to the MySQL database. Notice the execute function uses database connection pool (pool) to execute queries. It is possible to execute queries without a database pool, but why use that approach if we use other ways to make our application more performant.
Create Database Pool
Open the index.ts file used to create our express API and defined which middleware to use.
Import mysql.connector to trigger the init function to create a database pool. In that way, the pool is ready whenever we need to make a request to the database.
After having made those changes, the index.ts file should look have the following logic.
import express from 'express';
import compression from 'compression';
import helmet from 'helmet';
import cors from 'cors';
import { generateToken } from './api/utils/jwt.utils';
import * as path from 'path';
import routes from './api/routes';
import logger from './api/middlewares/logger.middleware';
import errorHandler from './api/middlewares/error-handler.middleware';
import * as MySQLConnector from './api/utils/mysql.connector';

const app = express();
const port = 3000;

// Only generate a token for lower level environments
if (process.env.NODE_ENV !== 'production') {
  console.log('JWT', generateToken());
}

// create database pool
MySQLConnector.init();

// serve static files
app.use(express.static(path.join(__dirname, '../public')));

// compresses all the responses
app.use(compression());

// adding set of security middlewares
app.use(helmet());

// parse incoming request body and append data to `req.body`
app.use(express.json());
app.use(express.urlencoded({ extended: true }));

// enable all CORS request
app.use(cors());

// add logger middleware
app.use(logger);

app.use('/api/', routes);

// add custom error handler middleware as the last middleware
app.use(errorHandler);

app.listen(port, () => {
  console.log(`Example app listening at http://localhost:${port}`)
});
Create Service Using MySQL Connector
In the application, the /teams API endpoints trigger event handlers defined the teams.controller.ts which does CRUD operations using an array of TEAMS stored in the application. The teams.controller.ts should look like this.
import { Request, RequestHandler, Response } from 'express';
import {
  ITeam,
  IGetTeamReq,
  IAddTeamReq,
  IUpdateTeamReq,
  IDeleteTeamReq
} from './teams.model';

const TEAMS: ITeam[]  = [
  { id: 1, name: 'Real Madrid', league: 'La Liga', isActive: true },
  { id: 2, name: 'Barcelona', league: 'La Liga', isActive: true },
  { id: 3, name: 'Manchester United', league: 'Premier League', isActive: true },
  { id: 4, name: 'Liverpool', league: 'Premier League', isActive: true },
  { id: 5, name: 'Arsenal', league: 'Premier League', isActive: true },
  { id: 6, name: 'Inter', league: 'Serie A', isActive: true },
  { id: 7, name: 'Milan', league: 'Serie A', isActive: true },
  { id: 8, name: 'Juventus', league: 'Serie A', isActive: true },
];

/**
 * Get active team records
 *
 * @param req Express Request
 * @param res Express Response
 */
export const getTeams: RequestHandler = (req: Request, res: Response) => {
  const activeTeams = TEAMS.filter((team) => team.isActive);
  res.send(activeTeams);
};

/**
 * Get team record based on id provided
 *
 * @param req Express Request
 * @param res Express Response
 */
// @ts-ignore
export const getTeamById: RequestHandler = (req: IGetTeamReq, res: Response) => {
  const team = TEAMS.find((team) => team.id === +req.params.id && team.isActive);
  res.send(team);
};

/**
 * Inserts a new team record based
 *
 * @param req Express Request
 * @param res Express Response
 */
export const addTeam: RequestHandler = (req: IAddTeamReq, res: Response) => {
  const lastTeamIndex = TEAMS.length - 1;
  const lastId = TEAMS[lastTeamIndex].id;
  const id = lastId + 1;
  const newTeam: ITeam = {
    ...req.body,
    id,
    isActive: true
  };

  TEAMS.push(newTeam);

  res.send(newTeam);
};

/**
 * Updates existing team record
 *
 * @param req Express Request
 * @param res Express Response
 */
// @ts-ignore
export const updateTeamById: RequestHandler = (req: IUpdateTeamReq, res: Response) => {
  const currentTeam = TEAMS. find((team) => team.id === +req.params.id && team.isActive);
  currentTeam.name = req.body.name || currentTeam.name;
  currentTeam.league = req.body.league || currentTeam.league;

  res.send({ success: true });
};

/**
 * deletes a team
 *
 * @param req Express Request
 * @param res Express Response
 */
// @ts-ignore
export const deleteTeamById: RequestHandler = (req: IDeleteTeamReq, res: Response) => {
  const teamIndex = TEAMS.findIndex((team) => team.id === +req.params.id && team.isActive);
  TEAMS.splice(teamIndex, 1);

  res.send({ success: true });
};
We will make changes to how the event handlers work in the teams.controller.ts file as they will use functions defined in a new service called teams.service.ts.
Create queries and service files
The teams.service.ts will be in charge of running the main business logic of our application, including making requests to the database to access or manipulate the data.
We are going to add two files: teams.service.ts and teams.queries.ts files inside src/api/teams/ folder.
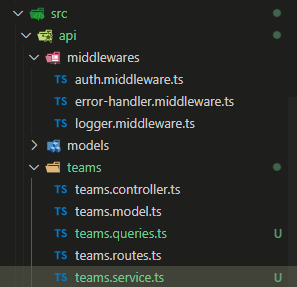
The teams.queries.ts file will contain all queries the teams.service.ts file use to make requests to the MySQL database.
Add CRUD queries
Open the teams.queries.ts file and add the following queries that perform simple CRUD operations. Feel free to take a look at each of the queries defined.
export const TeamQueries = {
  GetTeams: `
  SELECT
    id,
      name,
      league,
    (case when t.isActive is not null
      then 'true'
      else 'false'
    end) as 'isActive'
  FROM teams_system.teams as t
  WHERE
      isActive = true
  `,

  GetTeamsById: `
  SELECT
    id,
      name,
      league,
    (case when t.isActive is not null
      then 'true'
      else 'false'
    end) as 'isActive'
  FROM teams_system.teams as t
  WHERE
    id = ?
  `,

  AddTeam: `
  INSERT INTO teams_system.teams (name, league, isActive)
    VALUES (?, ?, true);
  `,

  UpdateTeamById: `
  UPDATE teams_system.teams
  SET name = ?,
      league = ?
  WHERE
    id = ?
  `,

  DeleteTeamById: `
  UPDATE teams_system.teams
  SET isActive = false
  WHERE
    id = ?
  `
};
If you checked out the queries, you probably noticed the usage of the question mark (?) in some of them. For instance, the UpdateTeamById query:
UpdateTeamById: `
  UPDATE teams_system.teams
  SET name = ?,
      league = ?
  WHERE
    id = ?
  `,
The question mark is in the query for us to leverage mysql package to parameterize values. This is a good way to prevent SQL injection attacks as these values might be populated based on the values submitted by the client in the request.
Add service functions
Open the teams.service.ts and import the TeamQueries from the teams.queries.ts and the execute function from the mysql.connector.ts.
import { execute } from "./../utils/mysql.connector";

import { TeamQueries } from "./teams.queries";
import { ITeam } from "./teams.model";
Generate functions that will execute CRUD operations using execute function and the queries imported.
import { execute } from "./../utils/mysql.connector";

import { TeamQueries } from "./teams.queries";
import { ITeam } from "./teams.model";

/**
 * gets active teams
 */
export const getTeams = async () => {
  return execute<ITeam[]>(TeamQueries.GetTeams, []);
};

/**
 * gets a team based on id provided
 */
export const getTeamById = async (id: ITeam['id']) => {
  return execute<ITeam>(TeamQueries.GetTeamsById, [id]);
};

/**
 * adds a new active team record
 */
export const insertTeam = async (team: ITeam) => {
  const result = await execute<{ affectedRows: number }>(TeamQueries.AddTeam, [
    team.name,
    team.league
  ]);
  return result.affectedRows > 0;
};

/**
 * updates team information based on the id provided
 */
export const updateTeam = async (team: ITeam) => {
  const result = await execute<{ affectedRows: number }>(TeamQueries.UpdateTeamById, [
    team.name,
    team.league,
    team.id
  ]);
  return result.affectedRows > 0;
};

/**
 * updates team information based on the id provided
 */
 export const deleteTeam = async (id: ITeam['id']) => {
  const result = await execute<{ affectedRows: number }>(TeamQueries.DeleteTeamById, [
    id
  ]);
  return result.affectedRows > 0;
};
Notice we imported the ITeam interface to get a reference of the records returned from executing fetching operations.
Update the controller
Finally, update the event handlers defined in the teams.controller.ts by using the functions generated in the teams.service.ts file.
Open the teams.controller.ts file and import the teams.service.ts file.
import * as TeamService from './teams.service';Then, update each of the request handlers in the teams.controller.ts.
Update getTeams Request Handler
Use the Teams.getTeams() function to fetch all active team records when triggering the getTeams request handler.
/**
 * Get active team records
 *
 * @param req Express Request
 * @param res Express Response
 */
export const getTeams: RequestHandler = async (req: Request, res: Response) => {
  try {
    const teams = await TeamService.getTeams();

    res.status(200).json({
      teams
    });
  } catch (error) {
    console.error('[teams.controller][getTeams][Error] ', typeof error === 'object' ? JSON.stringify(error) : error);
    res.status(500).json({
      message: 'There was an error when fetching teams'
    });
  }
};
Update getTeamById Request Handler
Use the Teams.getTeamById() function to fetch a specific team record when triggering the getTeamById request handler. Notice the Teams.getTeamById() requires the id argument, which is required as part of the request (req.params.id).
/**
 * Get team record based on id provided
 *
 * @param req Express Request
 * @param res Express Response
 */
// @ts-ignore
export const getTeamById: RequestHandler = async (req: IGetTeamReq, res: Response) => {
  try {
    const team = await TeamService.getTeamById(req.params.id);

    res.status(200).json({
      team
    });
  } catch (error) {
    console.error('[teams.controller][getTeamById][Error] ', typeof error === 'object' ? JSON.stringify(error) : error);
    res.status(500).json({
      message: 'There was an error when fetching team'
    });
  }
};
Update addTeam Request Handler
Use the Teams.insertTeam() function to insert a new team record when triggering the addTeam request handler. We provided the req.body as the argument as we expect a team object in the body of the request.
/**
 * Inserts a new team record based
 *
 * @param req Express Request
 * @param res Express Response
 */
export const addTeam: RequestHandler = async (req: IAddTeamReq, res: Response) => {
  try {
    const result = await TeamService.insertTeam(req.body);

    res.status(200).json({
      result
    });
  } catch (error) {
    console.error('[teams.controller][addTeam][Error] ', typeof error === 'object' ? JSON.stringify(error) : error);
    res.status(500).json({
      message: 'There was an error when adding new team'
    });
  }
};
Update updateTeamById
Use the Teams.updateTeam() function to update an existing team record when triggering the updateTeamById request handler.
/**
 * Updates existing team record
 *
 * @param req Express Request
 * @param res Express Response
 */
// @ts-ignore
export const updateTeamById: RequestHandler = async (req: IUpdateTeamReq, res: Response) => {
  try {
    const result = await TeamService.updateTeam({ ...req.body, id: req.params.id });

    res.status(200).json({
      result
    });
  } catch (error) {
    console.error('[teams.controller][updateTeamById][Error] ', typeof error === 'object' ? JSON.stringify(error) : error);
    res.status(500).json({
      message: 'There was an error when updating team'
    });
  }
};
Update deleteTeamById Request Handler
Use the Teams.deleteTeam() function to soft delete an existing team record when triggering the deleteTeamById request handler. This means we are not necessarily going to delete the team record, but we are going to update the isActive flag to false.
/**
 * deletes a team
 *
 * @param req Express Request
 * @param res Express Response
 */
// @ts-ignore
export const deleteTeamById: RequestHandler = async (req: IDeleteTeamReq, res: Response) => {
  try {
    const result = await TeamService.deleteTeam(req.params.id);

    res.status(200).json({
      result
    });
  } catch (error) {
    console.error('[teams.controller][deleteTeamById][Error] ', typeof error === 'object' ? JSON.stringify(error) : error);
    res.status(500).json({
      message: 'There was an error when deleting team'
    });
  }
};
Remove TEAMS constants
Now that we are not using the TEAMS array as the database for our API, go ahead and delete it from the teams.controller.ts file.
Once you delete it, the teams.controller.ts file should look like this.
import { Request, RequestHandler, Response } from 'express';
import {
  ITeam,
  IGetTeamReq,
  IAddTeamReq,
  IUpdateTeamReq,
  IDeleteTeamReq
} from './teams.model';
import * as TeamService from './teams.service';

/**
 * Get active team records
 *
 * @param req Express Request
 * @param res Express Response
 */
export const getTeams: RequestHandler = async (req: Request, res: Response) => {
  try {
    const teams = await TeamService.getTeams();

    res.status(200).json({
      teams
    });
  } catch (error) {
    console.error('[teams.controller][getTeams][Error] ', typeof error === 'object' ? JSON.stringify(error) : error);
    res.status(500).json({
      message: 'There was an error when fetching teams'
    });
  }
};

/**
 * Get team record based on id provided
 *
 * @param req Express Request
 * @param res Express Response
 */
// @ts-ignore
export const getTeamById: RequestHandler = async (req: IGetTeamReq, res: Response) => {
  try {
    const team = await TeamService.getTeamById(req.params.id);

    res.status(200).json({
      team
    });
  } catch (error) {
    console.error('[teams.controller][getTeamById][Error] ', typeof error === 'object' ? JSON.stringify(error) : error);
    res.status(500).json({
      message: 'There was an error when fetching team'
    });
  }
};

/**
 * Inserts a new team record based
 *
 * @param req Express Request
 * @param res Express Response
 */
export const addTeam: RequestHandler = async (req: IAddTeamReq, res: Response) => {
  try {
    const result = await TeamService.insertTeam(req.body);

    res.status(200).json({
      result
    });
  } catch (error) {
    console.error('[teams.controller][addTeam][Error] ', typeof error === 'object' ? JSON.stringify(error) : error);
    res.status(500).json({
      message: 'There was an error when adding new team'
    });
  }
};

/**
 * Updates existing team record
 *
 * @param req Express Request
 * @param res Express Response
 */
// @ts-ignore
export const updateTeamById: RequestHandler = async (req: IUpdateTeamReq, res: Response) => {
  try {
    const result = await TeamService.updateTeam({ ...req.body, id: req.params.id });

    res.status(200).json({
      result
    });
  } catch (error) {
    console.error('[teams.controller][updateTeamById][Error] ', typeof error === 'object' ? JSON.stringify(error) : error);
    res.status(500).json({
      message: 'There was an error when updating team'
    });
  }
};

/**
 * deletes a team
 *
 * @param req Express Request
 * @param res Express Response
 */
// @ts-ignore
export const deleteTeamById: RequestHandler = async (req: IDeleteTeamReq, res: Response) => {
  try {
    const result = await TeamService.deleteTeam(req.params.id);

    res.status(200).json({
      result
    });
  } catch (error) {
    console.error('[teams.controller][deleteTeamById][Error] ', typeof error === 'object' ? JSON.stringify(error) : error);
    res.status(500).json({
      message: 'There was an error when deleting team'
    });
  }
};
Testing the Code
Time to run the updated API and get data from a MySQL database. Go ahead and test the following API endpoints with Postman or curl:
GET/api/teams/GET/api/teams/:idPOST/api/teams/PATCH/api/teams/:idDELETE/api/teams/:id
Remember to provide the JWT token in the Authorization header as part of the request to authenticate the user.
Application not connecting to the database?
It is possible you will face connection errors between the application and the database when triggering the API endpoints. Make sure the environment variables are correctly set in the terminal you are using to run the API.
What’s Next?
If you’ve been following the Learn How to Use TypeScript With Node.js and Express.js series, hopefully, you found this article encouraging to keep working towards setting up a Node.js and Express.js project using Typescript. In the next article, we are going to explain How to Write Unit Tests in Node.js + Express.js with TypeScript.
Conclusion
All in all, in this article you learned how to integrate a MySQL database to a Node.js and Express.js API using TypeScript. We opted to not use an ORM to directly use SQL strings to make the requests between the application and the database. However, it is possible to use an ORM. In the end, it all comes down to what makes more sense in the project and whether using an ORM will be more beneficial than using regular SQL statements.
Did you like this article?
Share your thoughts by replying on Twitter of Become A Better Programmer or to my personal Twitter account.

