Note: This post is part of Learn How to Use TypeScript With Node.js and Express.js series. Click here to see the first post of the series.
Authenticating users who access an API is a common practice in software development to avoid letting anyone run processes they don’t have access to. Node.js and Express.js provide the option to generate middleware functions and execute them prior to triggering API endpoints when there is an incoming request, which is an ideal spot to add an authentication mechanism.
In this article, we are going to show you how to create an authentication middleware using JWT in Node.js with Express.js using TypeScript. You will understand what JWT is and add a function to generate one needed for testing. Then, we will create the authentication middleware and add it to API endpoints, which we will put in to test to ensure users with enough privileges have access to the specific processes.
Table of Contents
What is JWT?
JWT stands for JSON Web Token and is a common security practice to share information between two parties using a JSON object. Once JWTs are generated, there is no way to modify it, meaning the information contained within the JSON object will remain the same.
JWTs can be encrypted to provide secrecy between parties. However, it is common to sign them using a cryptographic algorithm or a public/private key pair using RSA. By having a signed token, it is possible to verify the integrity of the information contained in the JSON object.
Structure of a JWT
JWTs have a compact structure made of three parts separated by three dots (.):
- Header
- Payload
- Signature
Hence, if we look at the following JWT
eyJhbGciOiJSUzI1NiIsInR5cCI6IkpXVCJ9.eyJuYW1lIjoiQW5kcsOpcyBSZWFsZXMiLCJ1c2VySWQiOjEyMywiYWNjZXNzVHlwZXMiOlsiZ2V0VGVhbXMiLCJhZGRUZWFtcyIsInVwZGF0ZVRlYW1zIiwiZGVsZXRlVGVhbXMiXSwiaWF0IjoxNjQxOTA0NjgxLCJleHAiOjE2NDE5MDgyODF9.No2pOAF2SyR7xubc48DYREBQYqtjRBa00lDzw379OjQnKP45vlqXdbcd2K7VLr8himeX7yltHsjno0yi0JDKiRlWr49A4h6dNFU66kBVX84IkwHE35Aeb9d05av2bHKEiYKOlFOBDI_3y8wwwsNhRQyUrdnxgsM9oHzkGy3NMPHTkHsk4w9wuI78kppjoebcexxaWTsMB3ZCV0ypNDkWtVZ4q8dRBiNWW7RBEKw8NgZUtkIXzTVYd7Obu_6if7OnMObGtFr_SjcK74bSP2F3whiBixh1ZADKvsho-qqsPMgVGx1P4B7CLgtdJCjmcMHU7vnXoR-Blg4OfmQuslcrJw
We will find the each part of the JWT structure, where:
- Header =
eyJhbGciOiJSUzI1NiIsInR5cCI6IkpXVCJ9 - Payload =
eyJuYW1lIjoiQW5kcsOpcyBSZWFsZXMiLCJ1c2VySWQiOjEyMywiYWNjZXNzVHlwZXMiOlsiZ2V0VGVhbXMiLCJhZGRUZWFtcyIsInVwZGF0ZVRlYW1zIiwiZGVsZXRlVGVhbXMiXSwiaWF0IjoxNjQxOTA0NjgxLCJleHAiOjE2NDE5MDgyODF9 - Signature =
No2pOAF2SyR7xubc48DYREBQYqtjRBa00lDzw379OjQnKP45vlqXdbcd2K7VLr8himeX7yltHsjno0yi0JDKiRlWr49A4h6dNFU66kBVX84IkwHE35Aeb9d05av2bHKEiYKOlFOBDI_3y8wwwsNhRQyUrdnxgsM9oHzkGy3NMPHTkHsk4w9wuI78kppjoebcexxaWTsMB3ZCV0ypNDkWtVZ4q8dRBiNWW7RBEKw8NgZUtkIXzTVYd7Obu_6if7OnMObGtFr_SjcK74bSP2F3whiBixh1ZADKvsho-qqsPMgVGx1P4B7CLgtdJCjmcMHU7vnXoR-Blg4OfmQuslcrJw

What do these parts mean after all?
Header
The header consists in the type of token and the algorithm used to sign the token:
{
  "alg": "RS256",
  "typ": "JWT"
}
Payload
The payload contains information about an entity, such as the user information. This information is called claims and it typically contains additional information such as the issuer and the expiration date. This is an example of what of a payload
{
  "name": "Andrés Reales",
  "userId": 123,
  "accessTypes": [
    "getTeams",
    "addTeams",
    "updateTeams",
    "deleteTeams"
  ],
  "iat": 1641904681,
  "exp": 1641908281
}
Signature
The last part is the signature and it is the output generated using a cryptographic algorithm to sign the token using the header, the payload, and a secret key.
RSASHA256(
  base64UrlEncode(header) + "." +
  base64UrlEncode(payload),
  secretKey
)
In the case of using a key pair, it will require both, the public and the private key.
RSASHA256(
  base64UrlEncode(header) + "." +
  base64UrlEncode(payload),
  publicKey,
  privateKey
)
The signature allows to validate the information hasn’t changed.
How to Create Authentication Middleware in Node.js and Express.js using TypeScript
Now that you understand what is a JWT, it is time to work on creating an authentication middleware. We are going to create a helper function to generate test JWTs using the RS256 algorithm.
The RS256 algorithm uses a public and private key pair. The private key is used to generate the JWT. The authentication middleware will verify incoming requests have a valid JWT token using a public key.
Generate RSA Key Pair
Install openssl if you don’t have it on your computer. Once this is installed, proceed to the next step.
Open a new terminal, and run the following command to generate a 2048-bit RSA key.
openssl genrsa -des3 -out private.pem 2048Once the private key is generated, run the following command to export the RSA public key to a file.
openssl rsa -in private.pem -outform PEM -pubout -out public.pemAdd Private and Public Key in the root of the Node.js + Express.js App
Copy the private and public keys and paste them into the root of the project. We renamed the keys from private.pem and public.pem to private.key and public.key.
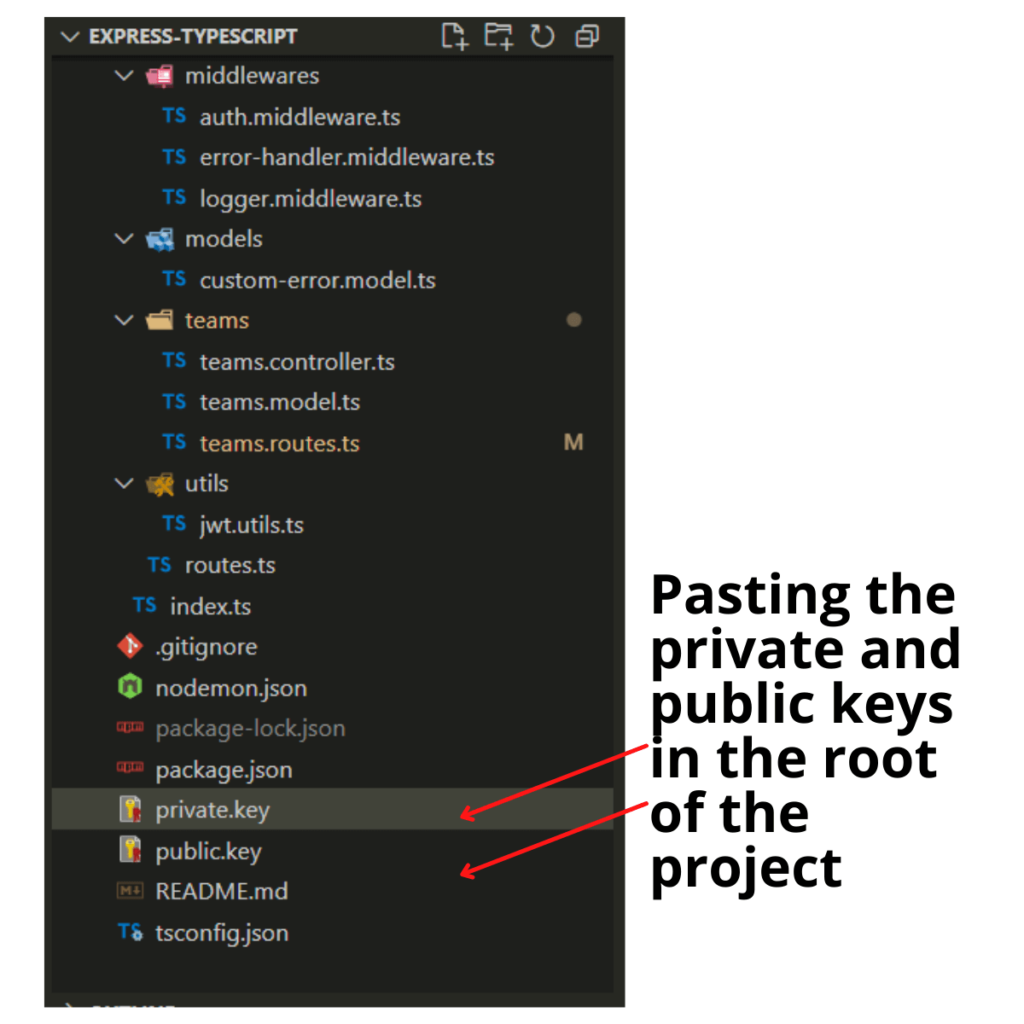
Update .gitignore File
You don’t want to have these keys to be publicly available in your repository. We can generate a .gitignore file to ignore certain files when committing the project to a repository. If you don’t have a .gitignore file yet, create it at the root of the project.
Then, add private.key and public.key and save the .gitignore file.

Add Function to Generate JWT
Install the jsonwebtoken package as a dependency.
npm i --save jsonwebtokenThe jsonwebtoken package will provide a sign function which we are going to use to generate a JWT using the private.key.
Create a utility file called jwt.utils.ts in the following folder location src\api\utils\jwt.utils.ts.
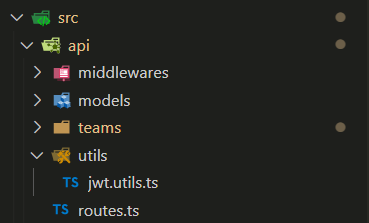
Open the jwt.utils.ts file and save the following piece of code:
import { sign, SignOptions } from 'jsonwebtoken';
import * as fs from 'fs';
import * as path from 'path';

/**
 * generates JWT used for local testing
 */
export function generateToken() {
  // information to be encoded in the JWT
  const payload = {
    name: 'Andrés Reales',
    userId: 123,
    accessTypes: [
      'getTeams',
      'addTeams',
      'updateTeams',
      'deleteTeams'
    ]
  };
  // read private key value
  const privateKey = fs.readFileSync(path.join(__dirname, './../../../private.key'));

  const signInOptions: SignOptions = {
    // RS256 uses a public/private key pair. The API provides the private key
    // to generate the JWT. The client gets a public key to validate the
    // signature
    algorithm: 'RS256',
    expiresIn: '1h'
  };

  // generate JWT
  return sign(payload, privateKey, signInOptions);
};
Let’s walk step-by-step through what this code does.
Remember when we installed jsonwebtoken packages? We are importing the sign function and the SignOptions type from the jsonwebtoken.
import { sign, SignOptions } from 'jsonwebtoken';
import * as fs from 'fs';
import * as path from 'path';
We create the generateToken function and the payload or information we want to have inside the token. You can change the name and userId if you want. We will use the access types defined below for this tutorial.
/**
 * generates JWT used for local testing
 */
export function generateToken() {
  // information to be encoded in the JWT
  const payload = {
    name: 'Andrés Reales',
    userId: 123,
    accessTypes: [
      'getTeams',
      'addTeams',
      'updateTeams',
      'deleteTeams'
    ]
  };

};
Then, we read the values of the private.key and use it to generate the signInOptions needed to generate the token.
// read private key value
  const privateKey = fs.readFileSync(path.join(__dirname, './../../../private.key'));

  const signInOptions: SignOptions = {
    // RS256 uses a public/private key pair. The API provides the private key
    // to generate the JWT. The client gets a public key to validate the
    // signature
    algorithm: 'RS256',
    expiresIn: '1h'
  };
Notice we used the RS256 algorithm, and also configured it to set an expiration date 1 hour from the moment the JWT is generated. Feel free to change the expiration date to other value such as 24 hours o 24h.
Finally, use the sign function to generate and return the JWT.
return sign(payload, privateKey, signInOptions);Open the index.ts file, and import the generateToken function to generate a JWT during project initialization and non-production environments to have a JWT output in the terminal which we can use to test API endpoints
import { generateToken } from './api/utils/jwt.utils';

const app = express();
const port = 3000;

// Only generate a token for lower level environments
if (process.env.NODE_ENV !== 'production') {
  console.log('JWT', generateToken());
}

// the rest logic

app.listen(port, () => {
  console.log(`Example app listening at http://localhost:${port}`)
});
In this way, it will log a new JWT every time your API starts. This is not necessary, but helpful and a convenient way to quickly access a usable JWT for your project.

Create JWT Authentication Middleware
Open the jwt.utils.ts file, and add the validateToken function underneath the generateToken function: Don’t forget to import the verify function and VerifyOptions types from the jsonwebtoken package.
import { sign, SignOptions, verify, VerifyOptions } from 'jsonwebtoken';
import * as fs from 'fs';
import * as path from 'path';

/**
 * generates JWT used for local testing
 */
export function generateToken() {
  // information to be encoded in the JWT
  const payload = {
    name: 'Andrés Reales',
    userId: 123,
    accessTypes: [
      'getTeams',
      'addTeams',
      'updateTeams',
      'deleteTeams'
    ]
  };
  // read private key value
  const privateKey = fs.readFileSync(path.join(__dirname, './../../../private.key'));

  const signInOptions: SignOptions = {
    // RS256 uses a public/private key pair. The API provides the private key
    // to generate the JWT. The client gets a public key to validate the
    // signature
    algorithm: 'RS256',
    expiresIn: '1h'
  };

  // generate JWT
  return sign(payload, privateKey, signInOptions);
};

interface TokenPayload {
  exp: number;
  accessTypes: string[];
  name: string;
  userId: number;
}

/**
 * checks if JWT token is valid
 *
 * @param token the expected token payload
 */
export function validateToken(token: string): Promise<TokenPayload> {
  const publicKey = fs.readFileSync(path.join(__dirname, './../../../public.key'));

  const verifyOptions: VerifyOptions = {
    algorithms: ['RS256'],
  };

  return new Promise((resolve, reject) => {
    verify(token, publicKey, verifyOptions, (error, decoded: TokenPayload) => {
      if (error) return reject(error);

      resolve(decoded);
    })
  });
}
Create a new file inside the middlewares folder called auth.middleware.ts.
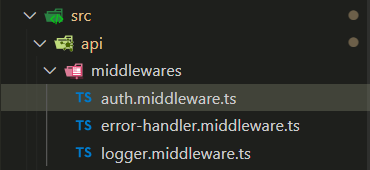
Then, add the following piece of code in the auth.middleware.ts file.
import { Request, Response, NextFunction } from 'express';
import { validateToken } from './../utils/jwt.utils';

/**
 * middleware to check whether user has access to a specific endpoint
 *
 * @param allowedAccessTypes list of allowed access types of a specific endpoint
 */
export const authorize = (allowedAccessTypes: string[]) => async (req: Request, res: Response, next: NextFunction) => {
  try {
    let jwt = req.headers.authorization;

    // verify request has token
    if (!jwt) {
      return res.status(401).json({ message: 'Invalid token ' });
    }

    // remove Bearer if using Bearer Authorization mechanism
    if (jwt.toLowerCase().startsWith('bearer')) {
      jwt = jwt.slice('bearer'.length).trim();
    }

    // verify token hasn't expired yet
    const decodedToken = await validateToken(jwt);

    const hasAccessToEndpoint = allowedAccessTypes.some(
      (at) => decodedToken.accessTypes.some((uat) => uat === at)
    );

    if (!hasAccessToEndpoint) {
      return res.status(401).json({ message: 'No enough privileges to access endpoint' });
    }

    next();
  } catch (error) {
    if (error.name === 'TokenExpiredError') {
      res.status(401).json({ message: 'Expired token' });
      return;
    }

    res.status(500).json({ message: 'Failed to authenticate user' });
  }
};
Understanding the Code
As you notice, we are storing a function inside the authorize variable. This function, accepts an array of allowedAccessTypes such as the access types used when setting the payload of the generateToken function.
accessTypes: [
'getTeams',
'addTeams',
'updateTeams',
'deleteTeams'
]
Then, we verify the incoming request has an authorization header where typically the JWT is provided. If there no token is found, send a unauthorized response.
    let jwt = req.headers.authorization;

    // verify request has token
    if (!jwt) {
      return res.status(401).json({ message: 'Invalid token ' });
    }

    // remove Bearer if using Bearer Authorization mechanism
    if (jwt.toLowerCase().startsWith('bearer')) {
      jwt = jwt.slice('bearer'.length).trim();
    }
Notice how we are extracting the word bearer if it exists as part of the authorization header. It is common to set the authorization header with the word bearer and the token. Hence, this would like this: bearer <jwt>.
Next, we decode the token using the validateToken function. Notice the validateToken functions reads the value of the public.key and it uses the same cryptographic algorithm (RS256) to run the verify function imported from the jsonwebtoken. The verify function determines if the token is valid and it returns the token decoded.
export function validateToken(token: string): Promise<TokenPayload> {
  const publicKey = fs.readFileSync(path.join(__dirname, './../../../public.key'));

  const verifyOptions: VerifyOptions = {
    algorithms: ['RS256'],
  };

  return new Promise((resolve, reject) => {
    verify(token, publicKey, verifyOptions, (error, decoded: TokenPayload) => {
      if (error) return reject(error);

      resolve(decoded);
    })
  });
}
Once decoded the JWT, we can have access to the payload object, for instance:
{
    name: 'Andrés Reales',
    userId: 123,
    accessTypes: [
      'getTeams',
      'addTeams',
      'updateTeams',
      'deleteTeams'
    ]
  }
Finally, back in the authorize function, we do a check to validate if the decoded token has any of the access types listed in the allowedAccessTypes argument. If no access types from the decoded token are found, return an unauthorized error.
const hasAccessToEndpoint = allowedAccessTypes.some(
      (at) => decodedToken.accessTypes.some((uat) => uat === at)
    );

    if (!hasAccessToEndpoint) {
      return res.status(401).json({ message: 'No enough privileges to access endpoint' });
}Note: The last part of the code in the authorize function can be customized to your project. For instance, a possibility is to make sure all the allowedAccessTypes items are found in decodedToken.accessTypes. Make this project your own by customizing it any way you want.
Add Authentication Middleware to API Endpoints
The last part of this is to add the authentication middleware to the API endpoints. In this tutorial, we are going to use the authentication middleware as a router-level middleware. However, it is possible to use the authentication middleware as application-level middleware.
Open the team.routes.ts folder, which contains all teams API endpoints (/api/teams/). Import the Authentication middleware as Auth.
import * as Auth from './../middlewares/auth.middleware';Then, add the Auth.authorize function as the first request handler for each API endpoint configuration providing as arguments a string array of valid access types. For instance, notice how we provide ['getTeams'] if you take a look at the following /api/teams/:id route configuration.
router
  .route('/:id')
  .get(
    Auth.authorize(['getTeams']),
    Controller.getTeamById
  );
In other words, whoever attempts to make a request to /api/teams/:id API endpoint must have a JWT and a payload inside the decoded JWT with an access type equivalent to getTeams.
Go ahead and configure the rest of the routes to use an authentication middleware with a specific array of allowedAccessTypes. The teams.routes.ts will look like this:
import { NextFunction, Request, Response, Router, } from 'express';
import * as Controller from './teams.controller';
import * as Auth from './../middlewares/auth.middleware';

const router = Router();

router
  .route('/')
  .get(
    Auth.authorize(['getTeams']),
    Controller.getTeams
  );

router
  .route('/:id')
  .get(
    Auth.authorize(['getTeams']),
    Controller.getTeamById
  );

router
  .route('/')
  .post(
    Auth.authorize(['addTeams']),
    Controller.addTeam
  );

router
  .route('/:id')
  .patch(
    Auth.authorize(['updateTeams']),
    Controller.updateTeamById
  );

router
  .route('/:id')
  .delete(
    Auth.authorize(['deleteTeams']),
    Controller.deleteTeamById
  );

export default router; Note: If we were to use the authorize method as an application-level middleware, we would open the index.ts file and include add it as a middleware using the app.use() method.
app.use(Auth.authorize([ALL_VALID_ACCESS_TYPES_IN_THE_APP]));Testing API Endpoints
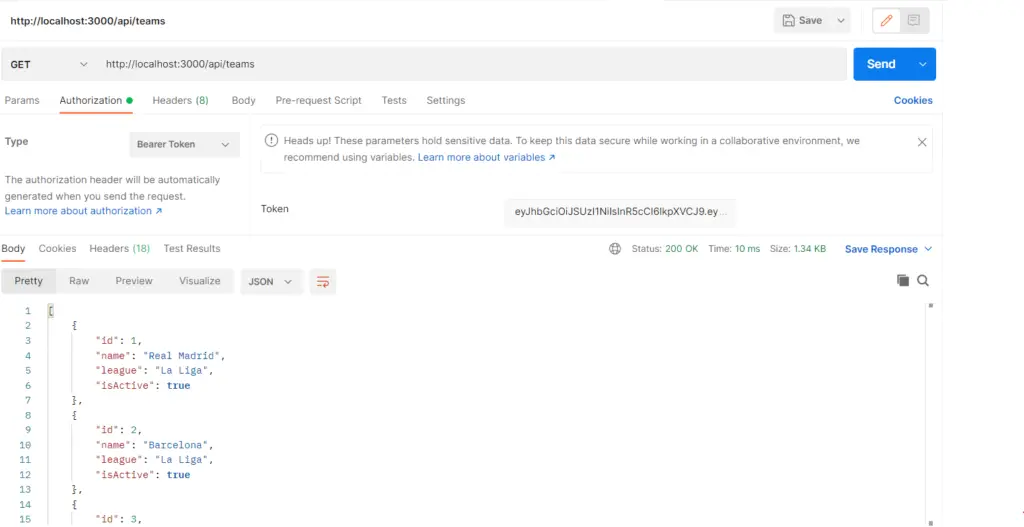
Now that you have added the JWT authentication middleware to the /api/teams/ endpoints, go ahead and test it. Feel free to use curl or Postman by getting the JWT generated during runtime and passing it as part of the Authorization header.
Personally, I prefer using Postman. If you decide using Postman, make sure to provide the token in the request by selecting the Authorization tab and selecting Bearer Token.
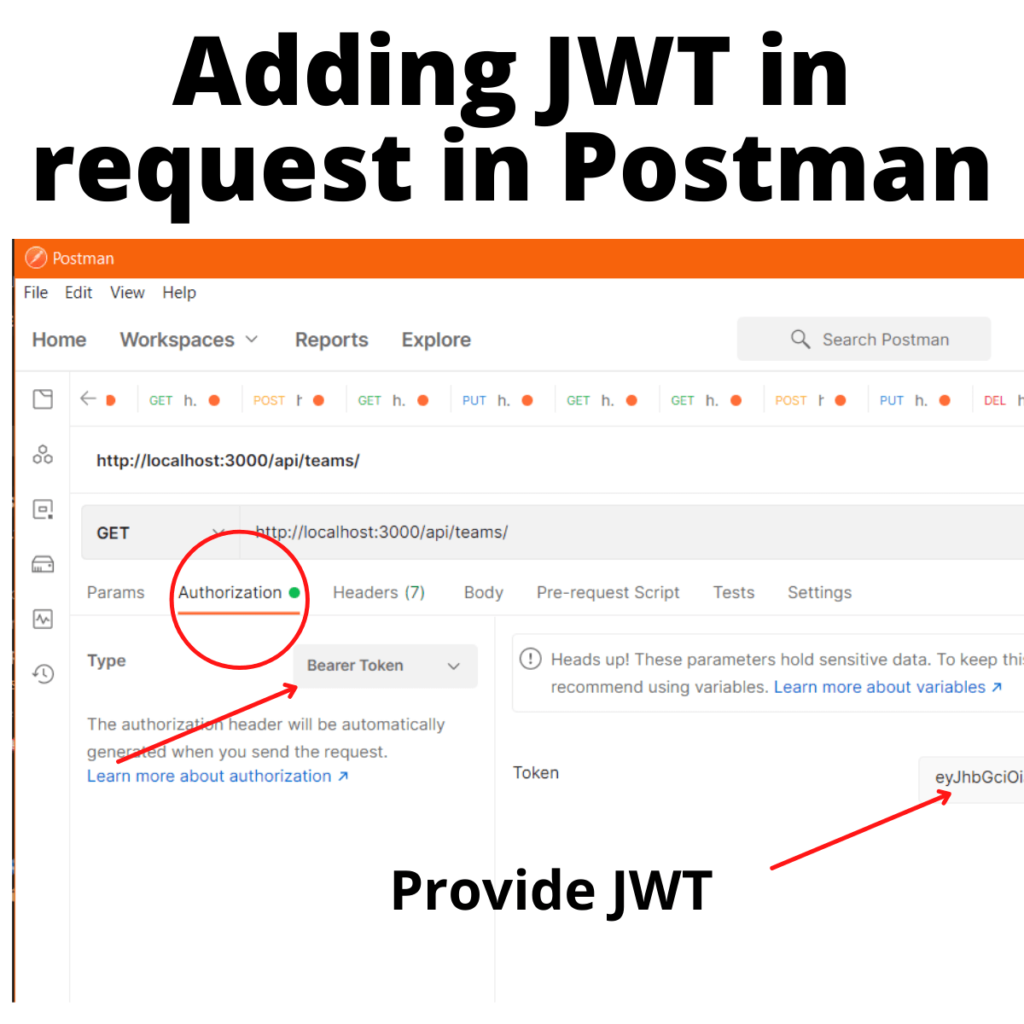
If everything is set up correctly and the token is valid, you should recieve the response from the API endpoint.
Feel free to start testing different scenarios such as modifying the payload used to generate the test token in the jwt.utils.ts file. In this case, I will remove the getTeams access type.
const payload = {
    name: 'Andrés Reales',
    userId: 123,
    accessTypes: [
      'addTeams',
      'updateTeams',
      'deleteTeams'
    ]
  };
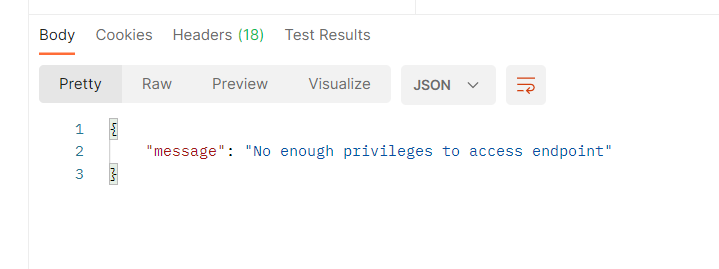
If you re-run the project and use the new token generated to make the request, you should receive an ‘Unauthorized’ error.
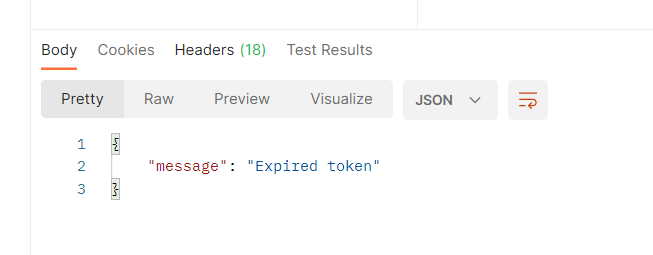
Or attempt to submit a token expired by updating the signInOptions in the generateToken function to use a small number such as 1ms.
const signInOptions: SignOptions = {
    // RS256 uses a public/private key pair. The API provides the private key
    // to generate the JWT. The client gets a public key to validate the
    // signature
    algorithm: 'RS256',
    expiresIn: '1ms'
  };
You should get an “expired token” response.
What’s Next?
If you’ve been following the Learn How to Use TypeScript With Node.js and Express.js series, hopefully, you found this article encouraging to keep working towards setting up a Node.js and Express.js project using Typescript. In the next article, we are going to explain How to Set Up an Error-Handling Middleware.
Conclusion
All in all, you learned about JWTs and how to create a JWT authentication middleware in Node.js and Express.js using TypeScript by implementing it as a router-level middleware. However, it is also possible to use it as an application-level middleware if we needed to authenticate all the incoming requests to our API.
Did you like this article?
Share your thoughts by replying on Twitter of Become A Better Programmer or to my personal Twitter account.

